Bowing to Tradition: How to Tie a Bowtie Like a Pro
10.10.2023 posted by Admin
The bowtie is a timeless classic that has been a staple in men’s fashion for centuries. Many may find the bowtie intimidating, but with the right know-how, it can be easy and fun to learn how to tie one. In this blog post, we will provide you with step-by-step instructions on how to tie a bowtie like a pro. Whether you’re getting ready for a wedding or a fancy dinner party, you’ll be able to show off your bowtie knotting skills in no time.
The Anatomy of a Bowtie
A bowtie may seem like a simple accessory, but its construction is quite intricate. Understanding the anatomy of a bowtie is key to mastering the art of tying one. A bowtie consists of three main parts: the band, the wings, and the knot. The band is the long strip of fabric that wraps around your neck and holds the bowtie in place. The wings are the two folded fabric pieces that create the bow shape. Lastly, the knot is the center of the bowtie, where the wings come together. By familiarizing yourself with these components, you’ll be able to tie a bowtie with ease. So, let's delve deeper into each part and unravel the mystery of the bowtie's anatomy.
Preparing the Bowtie
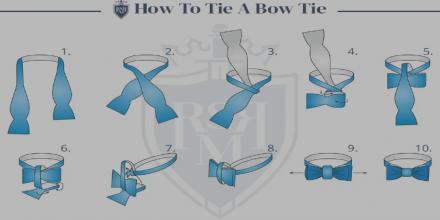
Before you can start tying your bowtie, it’s important to make sure it’s prepared properly. Start by draping the bowtie around your neck, with the right side longer than the left. Adjust the length so that the right side is about two inches longer than the left. Cross the longer end over the shorter end, forming an X. Then, bring the longer end underneath the shorter end and through the loop that is formed. Pull both ends tight to create a knot. Make sure the knot is snug but not too tight. Adjust the bowtie so that it sits at the center of your collar. With the bowtie prepared, you're now ready to move on to the next step - tying the basic knot.
Tying the Basic Knot
Now that you have prepared your bowtie, it's time to tackle the basic knot. Start by folding the longer end of the bowtie horizontally, creating a small horizontal loop in the center. Next, take the shorter end and fold it over the center of the loop, creating a shape that resembles a small bow. Hold the folded end in place with one hand, and use your other hand to fold the longer end back over the folded end. Bring the longer end through the loop created in the first step, and pull it snugly to secure the knot. Adjust the wings and the center knot to ensure they are symmetrical and neat. Voila! You have successfully tied a basic bowtie knot.
Perfecting the Look
Now that you have successfully tied your bowtie, it's time to perfect your look. The key to a polished bowtie is making sure everything is in place and symmetrical. Start by adjusting the wings to ensure they are equal in size and shape. Take your time and use a mirror if necessary. Next, focus on the center knot. Make sure it is centered and snug against your collar. Take a step back and assess the overall appearance of your bowtie. Is it straight and aligned properly? Does it sit at the right height on your collar? Make any necessary adjustments until you are satisfied with the final look. Remember, practice makes perfect, so keep practicing until you feel confident in your bowtie tying skills.
Variations and Styles
Now that you've mastered the art of tying a bowtie, it's time to explore the exciting world of variations and styles. The beauty of bowties lies in their versatility, as they can be customized to suit any occasion or personal style. For a classic and timeless look, opt for a solid-colored silk bowtie. If you want to make a bold statement, choose a patterned or printed bowtie that showcases your personality. For a more casual and relaxed vibe, try a bowtie made from a textured fabric like linen or cotton. You can also experiment with different knot styles, such as the butterfly knot or the diamond point knot, to add a unique twist to your ensemble. Don't be afraid to get creative and have fun with your bowtie choices – after all, it's the perfect accessory to showcase your individuality and sense of style.
The Anatomy of a Bowtie
A bowtie may seem like a simple accessory, but its construction is quite intricate. Understanding the anatomy of a bowtie is key to mastering the art of tying one. A bowtie consists of three main parts: the band, the wings, and the knot. The band is the long strip of fabric that wraps around your neck and holds the bowtie in place. The wings are the two folded fabric pieces that create the bow shape. Lastly, the knot is the center of the bowtie, where the wings come together. By familiarizing yourself with these components, you’ll be able to tie a bowtie with ease. So, let's delve deeper into each part and unravel the mystery of the bowtie's anatomy.
Preparing the Bowtie
Before you can start tying your bowtie, it’s important to make sure it’s prepared properly. Start by draping the bowtie around your neck, with the right side longer than the left. Adjust the length so that the right side is about two inches longer than the left. Cross the longer end over the shorter end, forming an X. Then, bring the longer end underneath the shorter end and through the loop that is formed. Pull both ends tight to create a knot. Make sure the knot is snug but not too tight. Adjust the bowtie so that it sits at the center of your collar. With the bowtie prepared, you're now ready to move on to the next step - tying the basic knot.
Tying the Basic Knot
Now that you have prepared your bowtie, it's time to tackle the basic knot. Start by folding the longer end of the bowtie horizontally, creating a small horizontal loop in the center. Next, take the shorter end and fold it over the center of the loop, creating a shape that resembles a small bow. Hold the folded end in place with one hand, and use your other hand to fold the longer end back over the folded end. Bring the longer end through the loop created in the first step, and pull it snugly to secure the knot. Adjust the wings and the center knot to ensure they are symmetrical and neat. Voila! You have successfully tied a basic bowtie knot.
Perfecting the Look
Now that you have successfully tied your bowtie, it's time to perfect your look. The key to a polished bowtie is making sure everything is in place and symmetrical. Start by adjusting the wings to ensure they are equal in size and shape. Take your time and use a mirror if necessary. Next, focus on the center knot. Make sure it is centered and snug against your collar. Take a step back and assess the overall appearance of your bowtie. Is it straight and aligned properly? Does it sit at the right height on your collar? Make any necessary adjustments until you are satisfied with the final look. Remember, practice makes perfect, so keep practicing until you feel confident in your bowtie tying skills.
Variations and Styles
Now that you've mastered the art of tying a bowtie, it's time to explore the exciting world of variations and styles. The beauty of bowties lies in their versatility, as they can be customized to suit any occasion or personal style. For a classic and timeless look, opt for a solid-colored silk bowtie. If you want to make a bold statement, choose a patterned or printed bowtie that showcases your personality. For a more casual and relaxed vibe, try a bowtie made from a textured fabric like linen or cotton. You can also experiment with different knot styles, such as the butterfly knot or the diamond point knot, to add a unique twist to your ensemble. Don't be afraid to get creative and have fun with your bowtie choices – after all, it's the perfect accessory to showcase your individuality and sense of style.