Capture Your Chromebook Screen: Simple Steps to Take a Screenshot
07.10.2023 posted by Admin
Do you need to capture something on your Chromebook screen? Taking a screenshot on a Chromebook is easier than you think. In this blog post, we'll show you how to take a screenshot of your Chromebook in just a few simple steps. Learn how to quickly capture and save the contents of your Chromebook's screen with our helpful guide.
Understanding the Different Methods of Taking a Screenshot on a Chromebook
Taking a screenshot on a Chromebook can be done in a few different ways, depending on what you want to capture. Understanding the different methods will give you the flexibility to capture exactly what you need. Whether you want to capture the entire screen, a specific window, or just a specific area, we've got you covered. In the following sections, we'll walk you through each method step-by-step, so you can choose the one that suits your needs best. Let's get started!
Method 1: Capturing the Entire Screen
Capturing the entire screen on your Chromebook is a quick and straightforward process. To do this, simply press the "Ctrl" and "Show windows" keys simultaneously. The "Show windows" key is typically located in the top row, between the brightness and volume keys. Once you press these keys together, your entire screen will be captured, and a notification will appear in the bottom right corner of your screen, indicating that the screenshot has been saved. It's that easy! Now you can easily capture and save anything on your Chromebook's screen.
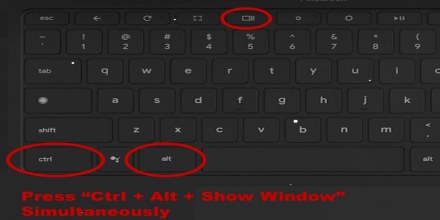
Method 2: Capturing a Specific Window
To capture a specific window on your Chromebook, you'll need to follow a slightly different method. First, make sure the window you want to capture is open and in focus. Then, press the "Ctrl" + "Shift" + "Show windows" keys simultaneously. The "Show windows" key is usually located in the top row of keys, between the brightness and volume keys. Once you press these keys together, your Chromebook will capture the specific window, and a notification will appear to let you know the screenshot has been saved. It's a convenient way to capture exactly what you need without any hassle.
Method 3: Capturing a Specific Area
If you only need to capture a specific area on your Chromebook screen, don't worry - there's a method for that too! First, press the "Ctrl" + "Shift" + "Show windows" keys together. The "Show windows" key can be found in the top row of keys, usually between the brightness and volume keys. Once you press these keys simultaneously, your Chromebook will let you select the specific area you want to capture by dragging your cursor. Release the cursor to capture the area, and you'll see a notification confirming that your screenshot has been saved. With this method, you have the flexibility to capture exactly what you need with precision and ease.
How to Save and Access Your Screenshots on a Chromebook
Once you've taken a screenshot on your Chromebook, the next step is to save and access it. To do this, simply click on the notification that appears in the bottom right corner of your screen after taking a screenshot. This will open the Files app, where you can see all your saved screenshots. From there, you can easily rename, move, or share your screenshots as needed. Saving and accessing your screenshots on a Chromebook is a breeze, allowing you to quickly and conveniently use them whenever you need.
Bonus Tips for Taking the Perfect Screenshot on a Chromebook
Capture the perfect screenshot on your Chromebook with these bonus tips! To ensure the best quality, make sure your screen is clean and free of smudges before capturing. Additionally, try adjusting the brightness and contrast settings to enhance the clarity of your screenshot. If you're capturing a specific area, use the gridlines feature in Chrome OS to align your shot perfectly. And finally, don't forget to experiment with different keyboard shortcuts and settings to find the method that works best for you. Happy screenshotting!
Understanding the Different Methods of Taking a Screenshot on a Chromebook
Taking a screenshot on a Chromebook can be done in a few different ways, depending on what you want to capture. Understanding the different methods will give you the flexibility to capture exactly what you need. Whether you want to capture the entire screen, a specific window, or just a specific area, we've got you covered. In the following sections, we'll walk you through each method step-by-step, so you can choose the one that suits your needs best. Let's get started!
Method 1: Capturing the Entire Screen
Capturing the entire screen on your Chromebook is a quick and straightforward process. To do this, simply press the "Ctrl" and "Show windows" keys simultaneously. The "Show windows" key is typically located in the top row, between the brightness and volume keys. Once you press these keys together, your entire screen will be captured, and a notification will appear in the bottom right corner of your screen, indicating that the screenshot has been saved. It's that easy! Now you can easily capture and save anything on your Chromebook's screen.
Method 2: Capturing a Specific Window
To capture a specific window on your Chromebook, you'll need to follow a slightly different method. First, make sure the window you want to capture is open and in focus. Then, press the "Ctrl" + "Shift" + "Show windows" keys simultaneously. The "Show windows" key is usually located in the top row of keys, between the brightness and volume keys. Once you press these keys together, your Chromebook will capture the specific window, and a notification will appear to let you know the screenshot has been saved. It's a convenient way to capture exactly what you need without any hassle.
Method 3: Capturing a Specific Area
If you only need to capture a specific area on your Chromebook screen, don't worry - there's a method for that too! First, press the "Ctrl" + "Shift" + "Show windows" keys together. The "Show windows" key can be found in the top row of keys, usually between the brightness and volume keys. Once you press these keys simultaneously, your Chromebook will let you select the specific area you want to capture by dragging your cursor. Release the cursor to capture the area, and you'll see a notification confirming that your screenshot has been saved. With this method, you have the flexibility to capture exactly what you need with precision and ease.
How to Save and Access Your Screenshots on a Chromebook
Once you've taken a screenshot on your Chromebook, the next step is to save and access it. To do this, simply click on the notification that appears in the bottom right corner of your screen after taking a screenshot. This will open the Files app, where you can see all your saved screenshots. From there, you can easily rename, move, or share your screenshots as needed. Saving and accessing your screenshots on a Chromebook is a breeze, allowing you to quickly and conveniently use them whenever you need.
Bonus Tips for Taking the Perfect Screenshot on a Chromebook
Capture the perfect screenshot on your Chromebook with these bonus tips! To ensure the best quality, make sure your screen is clean and free of smudges before capturing. Additionally, try adjusting the brightness and contrast settings to enhance the clarity of your screenshot. If you're capturing a specific area, use the gridlines feature in Chrome OS to align your shot perfectly. And finally, don't forget to experiment with different keyboard shortcuts and settings to find the method that works best for you. Happy screenshotting!